Beginners Guide to Digital Mobile Radio (DMR)
DMR in the UK continues to evolve at a fairly rapid rate with many new repeaters and changes in Talkgroups. There are now a number of competing DMR Networks in the UK. The UK has broken away from the DMR-MARC (the original American Network) due to the restrictions and limitations that DMR-MARC impose for membership of their network. The 'Phoenix' network superseded DMR-MARC, offering similar functionality but with more local control. However, similar restrictions imposed by Phoenix have lead to many UK DMR repeaters changing to the Dutch 'Brandmeister' network which allows almost limitless customisation and more importantly allows the use of local 'hotspots' so that the network can be accessed without the use of a land-based repeater.
Summary:
- DMR This is the Brandmeister 'breakaway' DMR network. The Brandmeister network was developed in the Netherlands and continental Europe and allowed the connection of RF Internet hotspots (see below) giving almost unlimited access to the network even for those not in range of a land-based repeater.
- DMR+ This the 'original' American lead DMR-MARC network that was established in the UK following the guidelines and restrictions of the Motorola Amateur Radio Club (MARC). Responsibility for running the UK side of the network was taken over by the Phoenix group of amateurs. This network is commonly referred to as DMR+ but is also known as the Phoenix network. DMR+ allows limited connection to DMR 'dongles' and devices i.e. short-range RF hotspots that access the network via the Internet.
- Although the DMR and DMR+ networks list similar talk groups (channels) the networks are completely separate and it's not possible to communicate from one to the other.
- Notwithstanding any of the above, various links between networks and even digital modes do exist, and the DMR system as a whole continues to evolve.
See the BlueDV for DMR and DSTAR guide for more details regarding hotspots.
Also, a number of local networks have evolved to meet the needs of local users without the limitations imposed by joining a larger nationwide or worldwide network. Such local networks consist of a small number of DMR repeaters offering just 2 channels or 'Talkgroups', one for working the single repeater and one for working all the repeaters in the local network.
Due to the rapidly evolving DMR system, this webpage will inevitably be out of date! Google is your friend here as there are many forums, websites and Facebook groups with active discussions on the current state of DMR in the UK.
Digital Mobile Radio or DMR is an exciting and rapidly expanding worldwide digital radio system that has been developed entirely by radio amateurs and receives no backing from the usual radio manufacturers. It should be noted that the current digital systems DSTAR (Icom), Fusion (Yaesu) and DMR (amateur support only) use different protocols and are mutually incompatible. However, the number of DMR repeaters is expanding rapidly so if you are not yet in range of one, you might be very soon!
- The DMR Network consists of VHF and UHF repeaters connected to the Internet
- All but one of the UK repeaters operate on UHF 70cms
- Access to a DMR repeater is essential to make full use of the system
- Each repeater has 2 digital ‘time slots’ which means that 2 QSO’s can be conducted at the same time, totally independent of each other.
- Each time slot has a number of ‘talk groups’
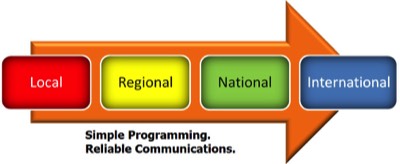
- The talk groups allow worldwide, regional or local QSO’s to be conducted.
- Select the talk group you wish to speak on and transmit
There are a number of ‘flavours’ of DMR.
The UK has broken away from the USA based DMR-MARC organisation and has established its own C-Bridge that connects the DMR repeaters to the worldwide network. This allows much more flexibility within the UK whilst still allowing worldwide contacts. The UK DMR network has been named 'Phoenix' to signify that it is separate from DMR-MARC
The DMR-Plus network is less strictly controlled and allows non-Motorola equipment to be used within the network. Hytera equipment is a popular choice for the repeaters and is less expensive than the equivalent Motorola kit. Also, the DMR-Plus network allows cross-network connections (e.g. to DSTAR) and it is expected that it will soon be possible to create a local hotspot to get into the DMR-Plus network if you are not within repeater coverage.
A more recent development is the adoption of the Dutch Brandmeister network system which allows the use of local 'hotspots' to access the network without the requirement for a land-based repeater.
There are also smaller ‘stand alone’ DMR networks, that are not linked to the world wide DMR network but are geographically linked to provide a more regional experience. An example is the SALOP (Shropshire) Net which currently consists of 2 repeaters GB7GT (Ludlow) and GB7BX (Much Wenlock). Such nets are not linked to the world wide DMR network, and use a much simpler system of talkgroups. See the SALOP Net website for further information.
Just to reiterate, it doesn’t matter what DMR radio you have, it can be used on any DMR network providing you are in range of the appropriate repeater - unless you have a local hotspot and then you can access the Brandmeister network anywhere you can access the Internet.
Motorola DP3600
Motorola DP3400
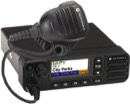
Motorola DM4600
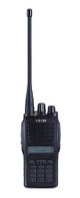
CSI CS700/CS701
The DMR system is based on a commercial digital standard and as such, differs from normal analogue equivalents in two important ways.
Firstly, in order to access the network and all of its features, the equipment has to be set up correctly using the appropriate manufacturer software and interface. If you purchase from an established radio dealer the radio will almost certainly come programmed with a ‘code plug’, however, there is no guarantee that the code plug will be 100% correct for your area. It is well within the capability of an experienced user to program their own gear, but DMRUK recommends that initially, the repeater keeper or someone nominated by him/her provides this service, This avoids any non-compatibility problems both to the individual and to the network.
Secondly, in order to program your radio, DMR-MARC will provide you with a unique identification number. Further information is available here - http://register.ham-digital.net
So you’ve read all about how great DMR is and have gone out and purchased a CSI CS700 UHF handheld. You get it home, charge it up and turn it on. It bleeps at you and you try pressing the keypad buttons and it bleeps some more. You know that it’s come from the dealer ‘programmed’ but how the heck do you tune it to your local DMR and Analog repeaters? This is a very ‘quick and dirty’ video to get you started. The menu system is very similar to the Motorola DMR radios, so if you can use the CS700 then you will be able to use a Motorola handheld too. Do bear in mind that just because the radio is pre-programmed, it doesn’t mean that the programming file (code plug) is actually correct as unless the dealer you purchased it from is just down the road, it won’t have been tested in ‘anger.’
As the DMR system is still evolving, you are going to have to get up close and personal with the Customer Programming Software (CPS). Although your radio will be programmed by the dealer, there is no guarantee that the code plug program file is 100% correct, so you will need to edit it. The nature of DMR radios, being based on those used mostly by non-radio specialists, means that it’s impossible to programme channels and frequencies using the keypad. You can change zones (groups of channels) and channels, but these must have been programmed in using the CPS. This excellent video produced by Mike K0NGA so it discusses setting up for the USA, however, it shows very well how the software works and explains contacts, zones and channels.
The CSI programming software is free, but it’s not without its annoying shortcomings. You can’t copy and paste and if you delete any of the ‘digital contacts’ the channels need relinking to the talk groups - no such thing as a free lunch etc - hi
The motorola CPS is much more user friendly, but it’s expensive, difficult to get hold of, the programming leads are not cheap and the radios are more expensive - making the CS700 a good starting point unless you have a friend with the Motorola CPS, program leads and the knowledge how to use them!
Beginners Guide To D-STAR
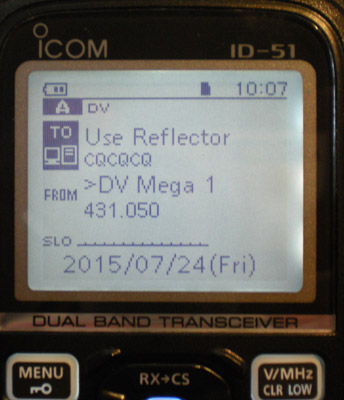
Above: Icom ID-51E Plus set to work through a D-STAR ‘DV Mega” UHF hotspot
Overview
D-STAR (Digital Smart Technologies for Amateur Radio) is a digital voice and data protocol specification for amateur radio. The system was developed in the late 1990s by the Japan Amateur Radio League and uses frequency-division multiple access and minimum-shift keying in its packet-based standard.
There are advantages to using digital voice modes are that it uses less bandwidth than analog voice modes such as amplitude modulation, frequency modulation, and single sideband. The quality of the data received is also better than an analog signal at the same signal strength, as long as the signal is above a minimum threshold, and there is no multipath propagation.
D-STAR compatible radios are available for VHF, UHF, and microwave amateur radio bands. In addition to the over-the-air protocol, D-STAR also provides specifications for network connectivity, enabling D-STAR radios to be connected to the Internet or other networks, allowing streams of voice or packet data to be routed via amateur radio.
D-Star Components of the D-STAR Network
D-STAR Repeater System
A D-STAR repeater system is typically composed of a repeater controller, 1.2GHz, 70cm or 2mtr digital voice repeater, digital data repeater and the Internet gateway PC.
The D-STAR repeater operates similar to an existing analogue repeater. That is a simple relay of transmit and receive communication within or across the 2m, 70cm or 23cm bands.
When D-STAR repeaters are connected with the Internet gateway, the D-STAR system relays the received data over the Internet. Your message will get through virtually to anywhere in the D-STAR system.
D-STAR Registry
As authorised users make their initial transmission to a D-STAR system, the call sign information attached to the digitised voice packets is recorded by the repeater controller. The controller then shares the information with other D-STAR systems through the D-STAR gateway registry. The registry is maintained on gateway servers located around the world. When an authorised D-STAR user makes a call to a call sign not currently registered on that repeater system, the registry allows the repeater controller to route the call to the repeater on which the targeted user was last registered.
D-STAR Reflector?
A reflector can be considered to be similar to a repeater, but with no RF capabilities. Reflectors are Internet connected servers, generally in data-centres, which receive a transmission from a connected gateway (via the Internet) and send it out to all other connected gateways for retransmission, via RF in the case of a repeater.
Reflectors are basically a conference bridge for D-STAR. They allow multiple D-STAR repeaters and Dongle users, from around the world, to be joined together and whatever information is transmitted across one of the repeaters is repeated across all of the connected repeaters.
So, what does all this mean to me?
So much for the definitions, but what can we do with DSTAR and why would you want to use it?
- Icom are the only company who produce and sell DSTAR radios and as there is no competition, they set their price and we have no choice but to pay their price if we want to use their radios. Icom DSTAR radios are more expensive than the equivalent analog FM mobile/handheld. However, the DSTAR protocol is ‘open’ so anybody can produce a DSTAR ‘device’ - more of this below.
- An Icom DSTAR radio can be used as a standard FM radio as well as being used for DSTAR communications.
- An essential part of the DSTAR system is the Internet connection. To take full advantage of DSTAR, your transmissions have to be able to get to the Internet by some means.
- If you are within range of a DSTAR repeater, then this will be your route into the Internet (providing the repeater is connected to the Internet as most of them are).
- If you are NOT in range of a DSTAR repeater, there are alternative ways of accessing the Internet such as a local ‘hotspot’ at your QTH. A hotspot is essentially a low powered repeater connected to your home Internet. An example of a DSTAR hotspot is the DVAP or DV Mega.
But is it Radio?
Ah, the age old question - and one that some amateurs will use to completely dismiss any mode of communication that doesn’t use RF alone.
This is something that you will have to consider and to make your own decision. Does DSTAR ‘work’ without a repeater or reflector and the Internet. The short answer is ‘No’ although you could still make simplex contacts, but you could do that with a conventional analog radio at a fraction of the price.
How is using DSTAR any different to other Internet modes of communication such as Skype or Echolink (or even a mobile phone?) Depending on what equipment you are using, it may be no different at all, but that’s missing the point really. Lets take a look at a few examples.
- I’m sitting at home and I’ve got my DV Dongle plugged into the computer. I’m connected to REF001C and I respond to a CQ call. The station tells me that he’s in a small apartment in New York and because he can’t erect and aerials, he’s also using a DV dongle. So, no RF, 100% Internet and very much like Skype - although I chose the reflector and therefore the ‘flavour’ on the QSO.
- I’m at home but I’m round and about the house and garden. I’ve got the DV Mega and Raspberry Pi hotspot running and it’s connected to the Internet using my home WiFi. I’ve got the DSTAR handheld clipped to my belt and it’s tuned to the DV Mega ‘simplex’ frequency. From the bottom of the garden, I send a command from the handheld to to the DV Mega to connect to reflector DCS005B and the DV Mega transmits back to me “Linked to DCS005B.” I set the handheld to ‘Use Reflector’ and I can chat to my hearts content - to a maximum distance of about 100m from the DV Mega hotspot. So RF from the handheld to the hotspot, RF from the hotspot to the internet via WiFi and then into the Internet network. What happens at the other end is entirely dependant on how the other station is operating.
- I’m out for a walk and fortunately I’m in range of my local DSTAR repeater. If I want a ‘local’ QSO, I’ll use the repeater just like a conventional analog repeater. However, if I want to reach out further, I’ll use the radio to send commands to the repeater to connect to another repeater or reflector of my choice via the Internet ‘gateway.’
- I’m doing some voluntary work driving a small mini-bus on a private estate carrying visitors up to the castle. I’m out of range of a DSTAR repeater and the castle doesn’t have WiFi and even if it did, it wouldn’t cover the 1.5 mile circuit of my route. Fortunately, I do have a mobile phone signal and access to ‘3G’ Internet data. I take my DV Mega with me and power it from a small ‘power pack’ battery. I either use the WiFi from the mobile phone (tether) or a small ‘MiFi’ portable 3G unit and I’m good to go. The handheld ‘speaks’ to the DV Mega and the DV Mega connects to the Internet via the phone/MiFi WiFi connection. Between passenger runs I have a number of QSO’s with stations all over the world.
So, there are a few examples of how you can use DSTAR when at home or out and about. It’s a very flexible system and it’s very enjoyable to experiment with the mode.

Above: A ‘DV Mega’ D-STAR Hotspot. The DV Mega board is mounted on a Raspberry Pi single board computer. This example uses a USB WiFi adaptor and therefore only needs a 5v power connection to be connected to be up and running
C4FM (Yaesu) Fusion Wires-X
What is Wires-X?
WIRES (Wide-coverage Internet Repeater Enhancement System) is an Internet communication system which expands the range of amateur radio communication. For WIRES-X, an amateur node station connecting to the Internet is used as the access point and connects the wireless communication to the Internet. Users' stations can communicate with other amateur stations all over the world using a node within the radio wave range.
Wires-X Features
WIRES-X supports the C4FM digital and the clear and crisp voice technology enables high sound quality. By repeating C4FM digital data as it is via the Internet, users can enjoy clear voice communications even if they are thousands of miles away each other.
Utilising the digital communication, the WIRES-X operation is simple, easy and user friendly. Varieties of the new functions as well as voice communications expands opportunities for enjoyment of ham station operation.
WIRES-X automatically connects to nodes and rooms via the Internet. No more need to verify connection IDs or transmit cumbersome DTMF connection codes. Information about nodes and rooms is exchanged via C4FM Digital signaling. Thanks to automatic reconnection to the previous contact, all you need to do is press PTT and start talking. Easily search for new nodes and rooms, and initiate communication promptly when you find an ID that captures your interest.
Currently active nodes and rooms can be searched in real time, and viewed on the display of your transceiver. The display list is sorted according to the number of stations currently connected to the room, in other words by popularity. This lets you quickly find other active stations to communicate with.
Node owners can freely create a room ID using letters and numbers. The ID works a bit like the name of a person. Easy to understand, meaningful names, unique names, memorable names... all are possible and can be used in a targeted search. A history of previous nodes and rooms, and a memory function with five categories makes it a snap to find and connect with a particular ID.
Wires-X Repeaters
Yaesu Fusion repeaters are becoming popular due to the low price set by Yaesu and other incentives offered to existing analogue repeater keepers. Replacement of existing analogue repeater equipment with the Yaesu DR-1X is a reasonably simple task and in addition to providing conventional analogue communications, it also provides C4FM Digital Voice (DV) functionality. A Fusion repeater with both analogue and DV will be listed as a 'Dual Mode' repeater. The DR-1X can be set up in a number of different ways to allow analogue/analogue, DV/DV, or a combination of both modes. When setup as a 'normal' dual mode repeater, the repeater will rebroadcast on the mode used to transmit into it. Call on analogue and analogue is rebroadcast. Call on DV and DV is the output mode. If two stations call on different modes at the same time, the strongest signal will win.
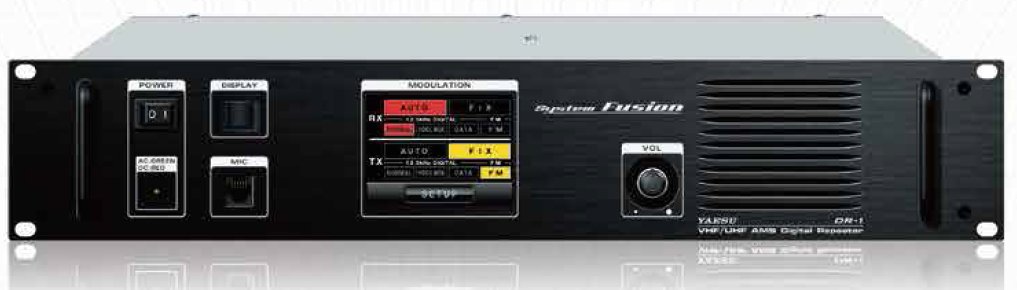
Below: Yaesu DR-1X Fusion Repeater
A fusion repeater can operate in 'stand-alone' mode in the same way as a conventional repeater. Stations within its coverage area will be able to call in to the repeater and will hear other stations within the coverage area. Coverage will be dependant on the usual limitations dictated by location, antenna and power output.
However, a DR-1X Fusion repeater can be linked to the Internet to provide world-wide coverage by being linked via the Internet to other Fusion repeaters around the world. The Yeasu network is called Wires-X and further details can be found by visiting the Yaesu Wires-X Website (link at the bottom of this page). The Wires-X network is hosted and managed by Yaesu. Yaesu require simple (and free) registration of all users of the Wires-X network and therefore are able to provide a list of users and locations.
If you are in range of a Fusion repeater that is linked to the Wires-X network, then all you need to establish world-wide communications is a Yaesu C4FM handheld, mobile or base station transceiver. It is therefore easy to conduct QSO's anywhere in the world where there is a Wires-X enabled Fusion Repeater - Node or Gateway.
Wires-X Nodes and Gateways
So, that's all well and good if you are in range of a Wires-X linked repeater, but what do you do if nobody in your area has been kind enough to set one up or if your local Fusion repeater isn't actually connected to the Wires-X network?
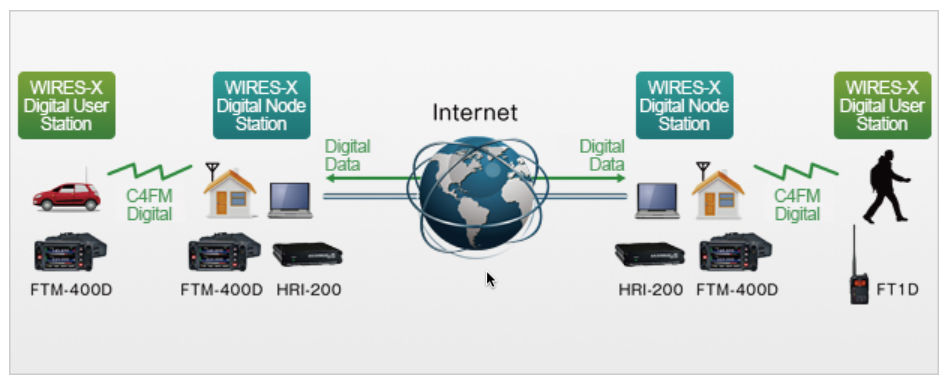
Yaesu have provided a simple but effective way of setting up a 'hotspot' that allows you to access the Wires-X network. This consists of a compatible Yaesu C4FM radio and the Yaesu HRI-200 Wires-X interface unit. The C4FM transceiver is used to transmit and receive RF signals and to send them to the Wires-X network via the HRI-200 unit and the Internet connected PC. It should be noted that the C4FM transceiver is an integral part of the Wires-X station and as such is controlled entirely by the HRI-200 unit and therefore cannot be used by the operator to transmit and receive manually (i.e. Using the radio hand mike). In order to access the Wires-X system, you need a SEPARATE transceiver.
For example, Using a C4FM handheld, you tune the handheld to the frequency set in the Wires-X software on the PC. You transmit on the handheld and your transmissions are received by the transceiver connected to the HRI-200 and PC. Those transmissions are sent by the radio to the HRI-200 and from there to the PC and the Wires-X network. When you stop transmitting, any reply from another station on the Wires-X network will be sent to your PC and from the PC to the transceiver which will now transmit that reply so that it can be received on the handheld.
The system described above is referred to as a 'Node' or a 'Gateway' and often these terms are used interchangeably but essentially they describe the same setup. The Node/Gateway is a 'Simplex Digital Voice' access point that can be accessed by anybody within range of that Gateway. Remember that this is not a 'repeater' as transmissions are not being simultaneously repeated on a different frequency - although confusingly enough, sometimes these Gateways are referred to as 'repeaters', however, clearly they are not 'repeating' the transmission.
As the Node/Gateway is accessible by third-party stations, they are subject to a UK Notice of Variation (NoV) to the Amateur Radio licence. The good news s that it is fairly simple to obtain an NoV, even as a Intermediate licence holder, so this does not present a significant challenge. If you are unable to obtain an NoV, it is still possible to operated a Node (but not a Gateway for others to use) by reducing the power output of the Node radio to its absolute minimum and transmitting into a suitable dummy load rather than an antenna. The coverage of the Node is thus reduced to a matter of feet, but is still sufficient to allow 2-way communication into the Wires-X network by using a handheld within that limited area.
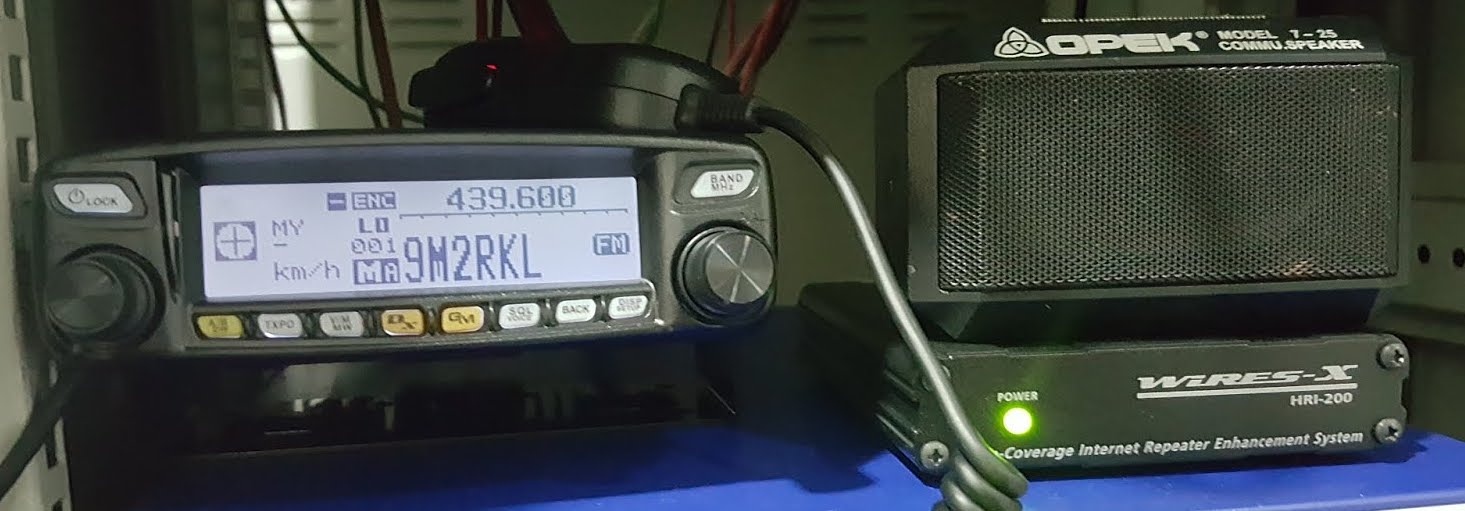
Below: A typical Fusion 'gateway' consisting of an FTM-100D, HRI-200 and a Windows PC (not shown)
Repeaters, Nodes, Gateways - and Rooms!
So now we have increased our coverage significantly. Not only can you access all the Fusion repeaters connected to the Wires-X network, but you can connect to the Nodes and 'Rooms' too.
Rooms, what the heck are rooms you may ask? If all the repeaters, nodes and gateways were all connected to each other all the time, complete mayhem would be the order of the day. Every Wires-X node and gateway has its own allocated 'room' or reflector or talkgroup (if you are more familiar with DMR or DSTAR) that can be named as you wish. Each room is identified by a unique number (see the links below to the Wires-X website and the Gateway Map). Examples of some of the more popular rooms are UK-NET-HUB, AMERICA-LINK, MNWIS-LINK and ALABAMA-LINK. Any number of nodes, gateways and repeaters can be 'in' a room, allowing rooms of many flavours.
Rather than trying to give examples of all the varied permutations possible, further study via the links below is recommended. The 'Wires-X Bible' produced by the HamOperator.com team is highly recommended as this brings together many different guides in one source document.
CQ-UK Room (ID: 27793)
Stu M0SGS hosts the CQ-UK room (ID 27793), one of the most active Fusion rooms at present. Stu has produced some excellent tutorial videos on how to setup and use C4FM Fusion. See the link to Stu's Youtube channel below.
What's a DV Mega and why do I need one?
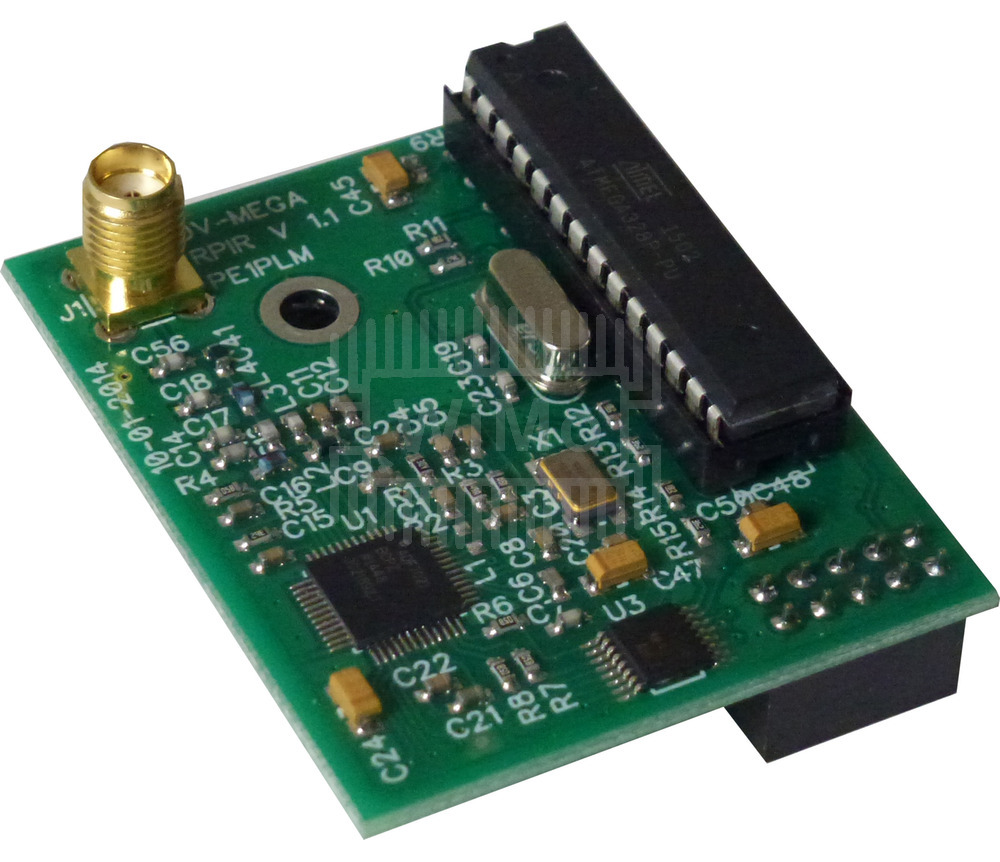
The DV Mega board (see above) is a tiny, low-power (10mw) UHF/VHF transmitter and receiver. By using it in conjunction with a Raspberry Pi, Arduino or a Bluestack Micro board, it becomes an RF 'hotspot' that can be connected to the Internet and will allow worldwide Digital Voice (DV) communications using nothing more than a handheld radio. It should be noted that the DV Mega combination only passes on transmissions and the processing of DV signals is done by the handheld. Therefore, although the DV Mega will work with DMR, DSTAR and C4FM Fusion signals, you would need 3 separate handheld radios to be able to work all 3 DV modes.

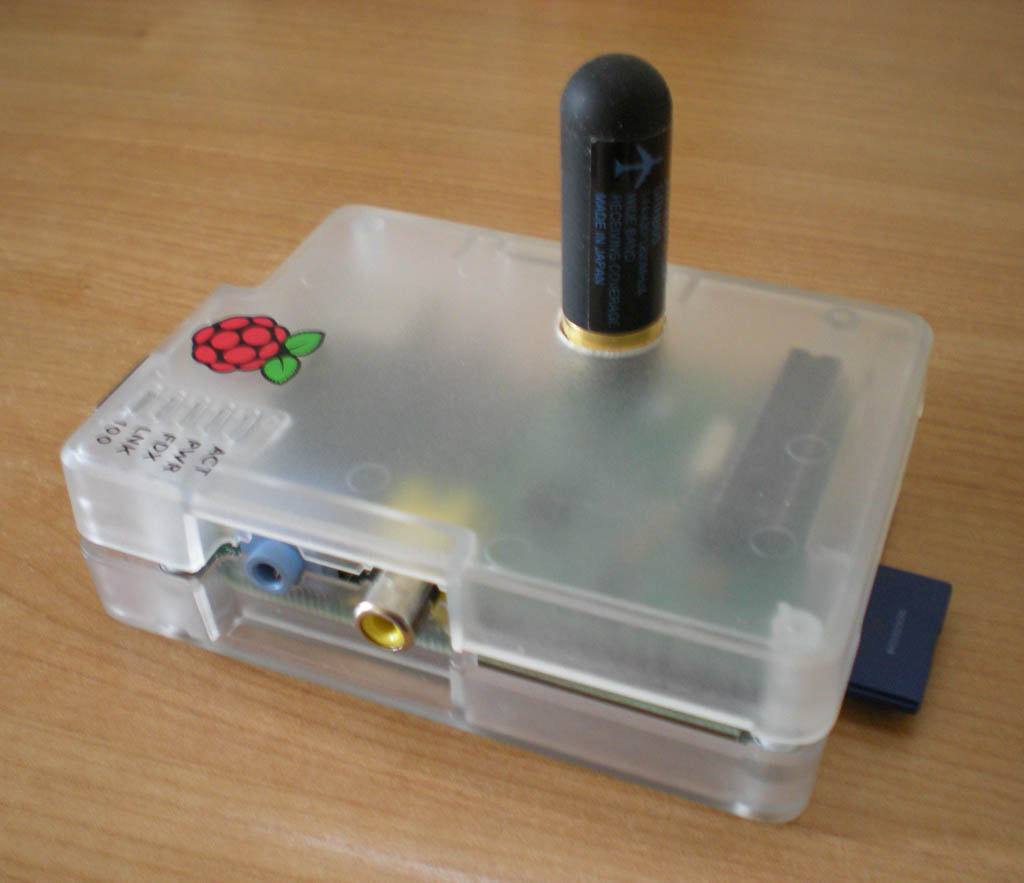
The DV Mega unit can be plugged into a Raspberry Pi computer (see above) to make a self-contained RF hotspot. Software developed by Johnathan G4KLX is loaded onto the Raspberry Pi and configured either by using a monitor and keyboard plugged into the Pi, or by accessing the Pi remotely from another computer on the same network. Once the Pi is programmed, the monitor and keyboard can be removed and the Pi run stand-alone. In order to access the Internet, the Pi requires either an Ethernet cable connection, or a wifi link. By using wifi and an Internet enabled device such as a mobile phone or a portable 'MiFi' unit, the DV Mega and Raspberry Pi unit can become a truly portable hotspot to be used when mobile or even pedestrian mobile. Note that the Raspberry Pi will require a power source, either from a 5.0v USB mains adaptor or a portable 'power bank' battery.
Below: Raspberry Pi and DV Mega combination
In addition to being used as a stand-alone hotspot, the DV Mega/Raspberry Pi unit can be connected to a Linux PC and can run additional software such as MMDVM allowing additional functionality when used as a 'fixed' hotspot.
If what you have read so far sounds a little daunting, there is a much simpler way of using the DV Mega to setup a DV hotspot, and this involves the use of a 'Bluestack Micro' board. The Bluestack Micro board comes in two versions, the Basic and the Plus.
Below: Bluestack Micro Basic (Left) and the Bluestack Micro Plus (Right)
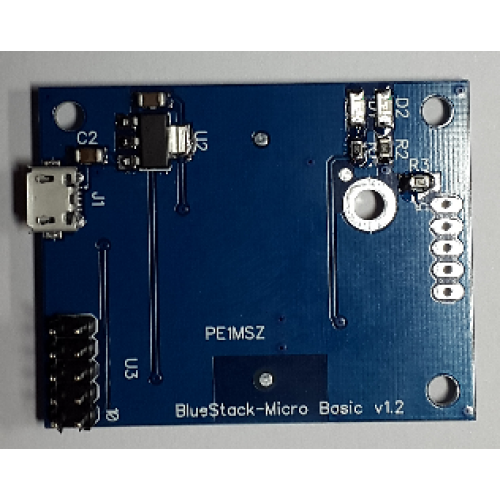

The DV Mega is plugged into the Bluestack Micro board making a very compact unit (approx 5cm x 4cm). No programming knowledge is required as the DV Mega/Bluestack hotspot is controlled by a free Android App developed by David PA7LIM. An iOS app is also being developed by David.
Below: DV Mega and Bluestack Micro Basic combination

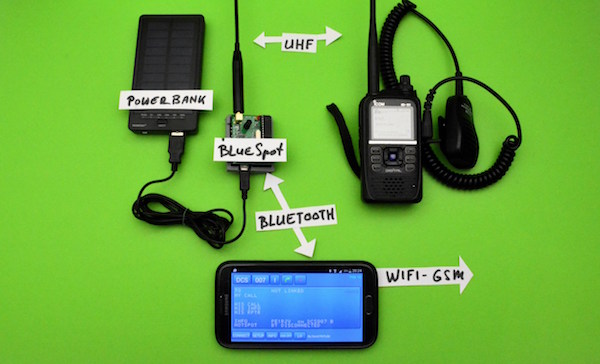
The picture below shows how the DV Mega and Bluestack Micro hotspot works. In this example, a DSTAR radio is shown, but the device works with DSTAR, DMR and C4FM Fusion DV modes.
The portable power bank powers the hotspot and the Android device running the free BlueDV App controls the hotspot via Bluetooth (the app is titled 'BlueSpot' in the picture - a trade name already in use, so the app has been renamed BlueDV). The Android device is connected to the internet by wifi, either using its own connectivity if it's connected to the mobile phone data network, or from a portable 'MiFi' unit or a home wifi connection. The radio receives and transmits to the hotspot which relays the information to and from the Internet via the DV Mega/Bluestack and the BlueDV app.
Below: DV Mega, Bluestack Micro and BlueDV modus operandi

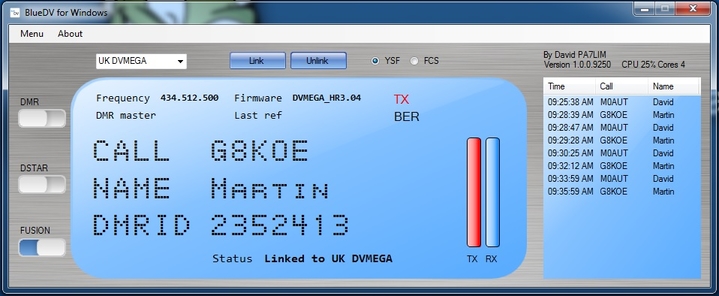
The free BlueDV Android app is undergoing continual development by David PA7LIM and the current version at the time of writing is shown below. In this example, the BlueDV app has set the DV Mega to the C4FM Fusion YSF reflector UK_YSF_BM_UK. David is currently working on an iOS version of the BlueDV software to allow it to be used on iPhones and iPads.
Below: The BlueDV 'control' app running on a Samsung 7 inch Android tablet

David PA7LIM has also developed a version of his software that runs on a Windows PC called BlueDV for Windows. This allows additional information to be displayed and clickable links to QRZ.com. It is no exaggeration to say that David has revolutionised the use of the DV Mega/Bluestack unit and what he has achieved is truly outstanding. Remember, all of David's software is free and had been developed by him in his own time for the benefit of the Amateur community as a whole.
Below: BlueDV for Windows
So, why do I need one?
If you recognise any of the following statements, then you really do need to consider going down the DV Mega hotspot route:
- I'd like to experiment with Digital Voice (DV)
- I already have a DMR/DSTAR/C4FM Fusion radio
- I don't have a land-based DMR/DSTAR/C4FM Fusion repeater that I can access
- I'd like to operate DV mobile, or from a location where there isn't any repeater coverage
- I'd like to be able to make worldwide QSO's using only a handheld radio
- I like to be able to wander around the house and garden with a handheld and still be able to speak to other amateurs
Note: Although the DV Mega Hotspot only transmits at a power of 10mw, this is sufficient to provide good 2-way communication throughout even a large house and garden
Access DMR, DMR+, DSTAR and C4FM Fusion using a 'Hotspot'
Because the BlueSpot name was registered to a company, David (PA7LIM) had to change the name to BlueDV. The new BlueDV application is deployed on the Android store. Please remove BlueSpot from your device first!
This page is incomplete at the moment, but in the meantime take a look at the BlueDV website for an explanation of how to access both DMR and DSTAR via a DV Mega/BlueStack unit and an Android device using the BlueDV App.
This is by far the SIMPLEST way to create a hotspot that will allow access to the Brandmeister DMR network and also DSTAR reflectors without the need for a land-based local repeater. There is no requirement for a computer (e.g. Raspberry Pi), no programming and no need to be a computer genius! This is the closest you can get to 'Plug and Play.'
Items required:
An appropriate radio (DMR or DSTAR - it's the radio that does the digital encoding and decoding, not the attached devices)
- A 'DV Mega' either single band or dual band (with the latest firmware loaded)
- A 'BlueStack' micro board to mount the DV Mega on
- A standard 5v mini USB power supply (either by mains adaptor of a battery power bank)
- An Android device to run the free BlueDV App
- The free BlueDV app available via the Google Play Store
- Internet access, either home wifi or via the mobile phone network using a phone or 'wifi' unit
Note: An alternative approach is to use a 'DV4 Mini' USB hotspot. These CAN work very well, but setup is VERY critical and experience has shown that it can be difficult to achieve the same quality of transmission as when using a DV Mega based device.
SharkRF OpenSpot
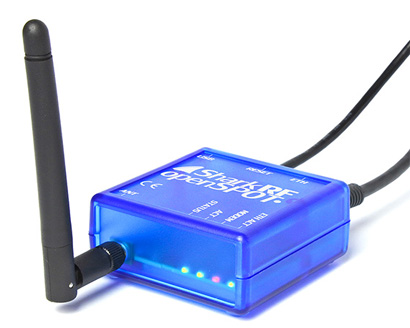
An alternative solution to getting on the air with the various digital modes. Simpler than the DV Mega or the DV4Mini as it's a stand-alone device that runs with minimal setup. No Raspberry Pi or other computer required during operation, just plug the OpenSpot into your home network router and configure using a web browser on your phone/tablet/computer and then it works by itself.
There is a very active online support structure for the OpenSpot, so Google is your friend here. Lots of instructional videos on Youtube showing just how to setup and operate on DMR, DTAR and C4FM Fusion. You can even use a DMR radio to access the Fusion network and vice-versa.
Although the OpenSpot doesn't have wifi, it is possible to use it mobile/portable by using a 'mifi' portable wifi unit and a cheap travel router plugged into the OpenSpot by Ethernet cable.
I picked up an OpenSpot at the 2017 Newark Hamfest, set it up for C4FM Fusion and worked 'mobile' on the way back from Newark to Shropshire - it's THAT easy! Well, it's easy providing you have done a bit of preparatory study beforehand. I already had a DV Mega, a portable 'mifi' and a very cheap Android phone running BlueDV (See the earlier section) and I worked mobile with the Yaesu FT1XD and headset on the way to the rally. Having read up about using the OpenSpot mobile (it doesn't have wifi connectivity, only wired ethernet) I had already setup my TP-Link travel router to act as a 'client' to link to my mifi unit and brought along a short Ethernet cable to link the router to the Openspot.
So, in summary, I fired up the mifi unit, connected the travel router to the OpenSpot via Ethernet cable and plugged both the router and the OpenSpot into a portable power bank. I then logged in to the OpenSpot web interface using an Android tablet logged into the mifi network and set the OpenSpot to my FT1XD simplex frequency and to the C4FM Fusion CQ-UK 'room'. That was it, all good to go and no need to make any further changes to the radio or OpenSpot and continuous coverage all the way home!
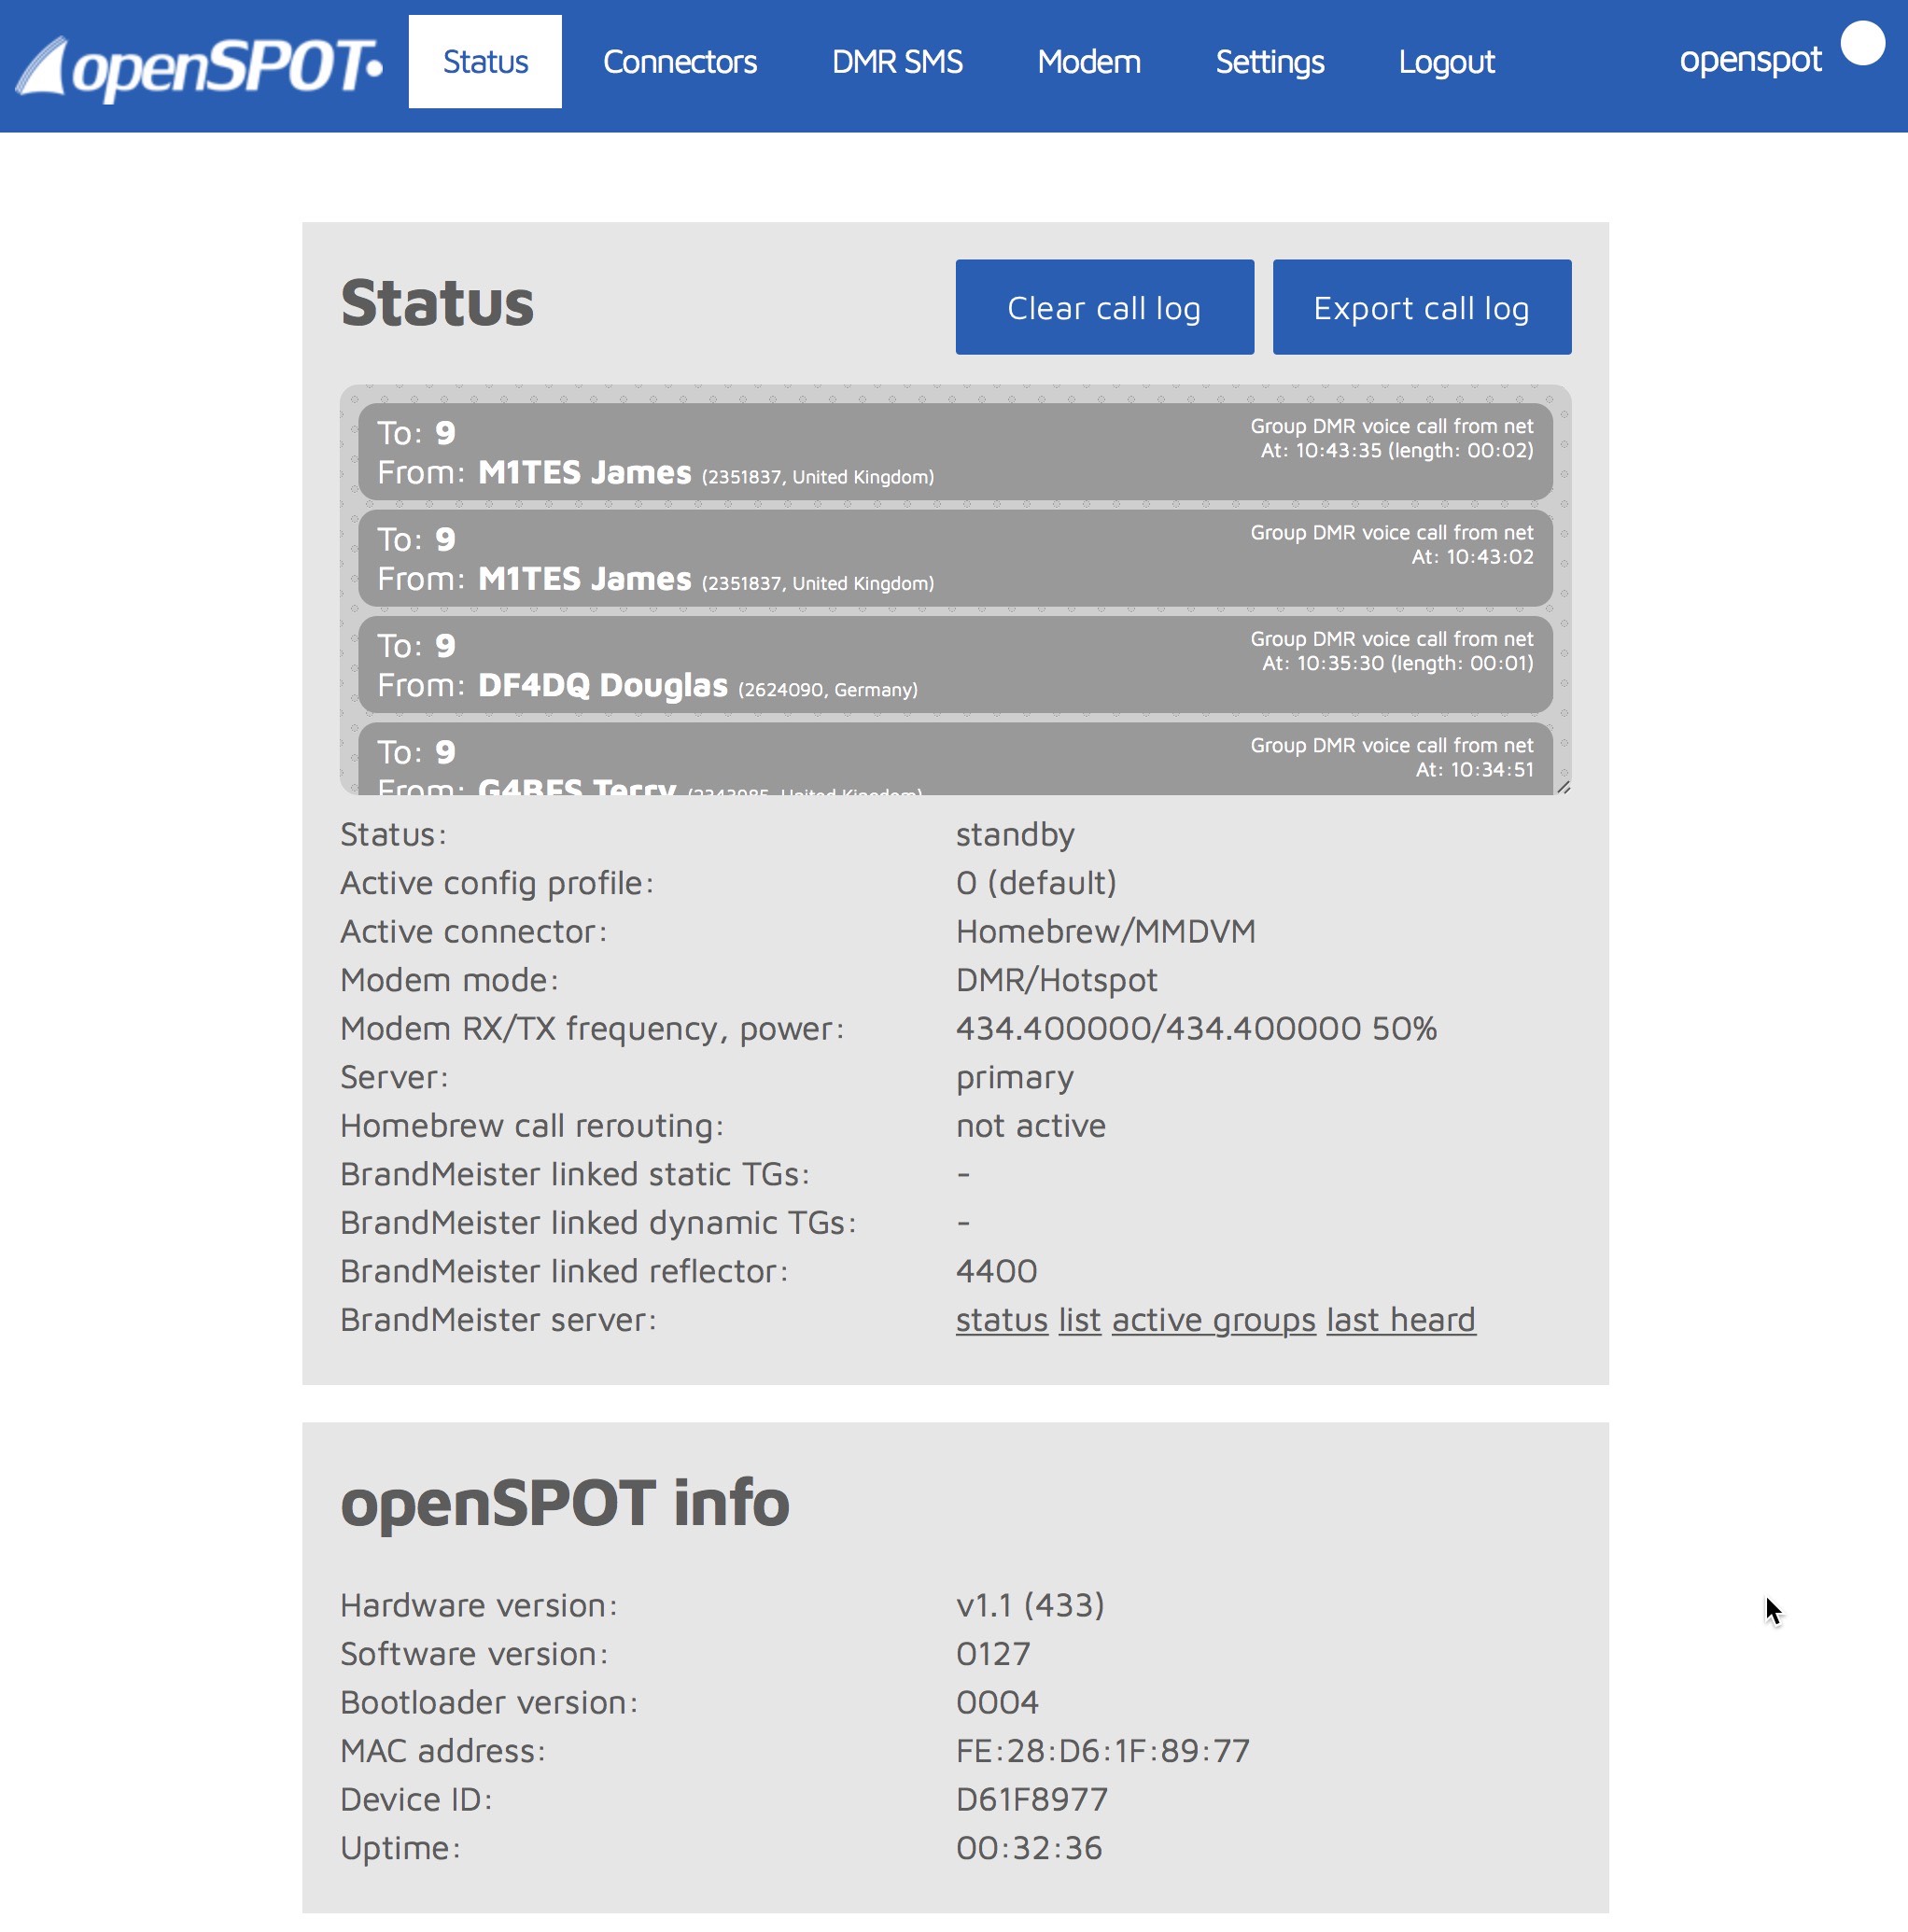
Above: This is the OpenSpot Admin Panel Status window seen when logged into the OpenSpot from a web browser on a computer, tablet or mobile phone. The other menu options allow the OpenSpot to be setup for the mode you wish to operate. The online manual on the OpenSpot website is comprehensive and there are many Youtube videos showing how the device is setup. In the screenshot above, the mode is DMR (Brandmeister) and the talk group is 4400. Once the OpenSpot has been setup, there is no need to have the Admin Panel running. You can close your browser and control the OpenSpot via the radio.
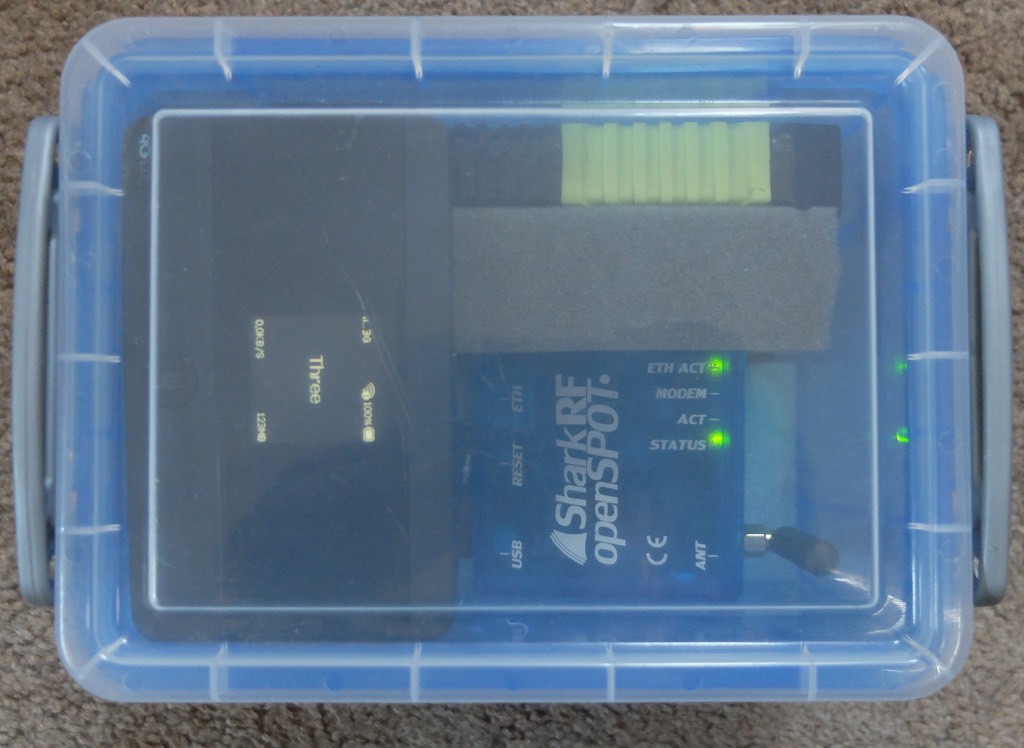
Above: This is my portable OpenSpot setup. It's completely self contained, doesn't need any other devices other than the radio and start to operate immediately after power-up. In addition to the OpenSpot unit, to operate portable you need a WIFI data connection, either from a mobile phone or a portable WIFI unit, a travel router to pick up the WIFI and transfer it to the OpenSpot via Ethernet cable, and a USB power supply to drive the OpenSpot and the router.

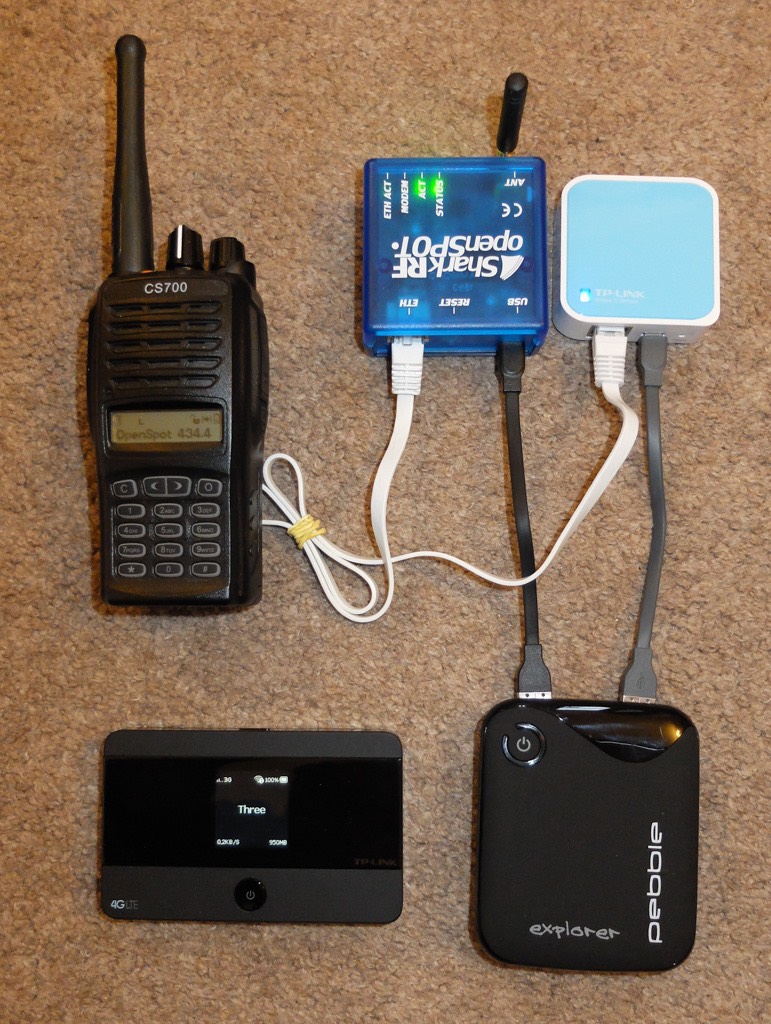
Above: Another shot of my portable OpenSpot unit. Remember that the current OpenSpot model does not have WIFI connectivity, only CAT5 Ethernet. Therefore, to operate portable, an additional component is required - a WIFI travel router operating in client mode to connect to a WIFI source and to transfer data to and from the OpenSpot via Ethernet cable.
Components above are:
- Top left, TP-Link WR702N Travel Router
- Top-right, the OpenSpot unit
- Bottom-right, TP-Link M7350 4G mobile WIFI
- Bottom-light (partially hidden under the WIFI unit) USB power bank
- Bottom-left, USB power bank
I use 2 USB power banks as I don't have a single unit with 2 USB outputs small enough to fit in the box. I've now replaced the larger power bank with another of the smaller 2600mAh units (as shown at bottom-left) as this was a cheaper option than buying a new unit with 2 USB outputs. The mobile WIFI has a battery life of about 10 hours and the 2 small 2600mAh unit are still showing half-charge after about 6 hours of continuous use, so such a setup is an all-day operating option. The TP-Link Travel Router that I use has now been replaced by a slightly more capable unit, but the old one works just fine. There are a number of videos on YouTube showing exactly how to setup the router in 'client' mode.
Below: The same setup as above, but with a new dual USB output 8400mAh power bank. Top-left, CSI CS700 DMR radio. Top-centre, RF Shark OpenSpot. Top-right, TP-Link travel router. Bottom-left, TP-Link portable WIFI. Bottom-right, Pebble Explorer power bank